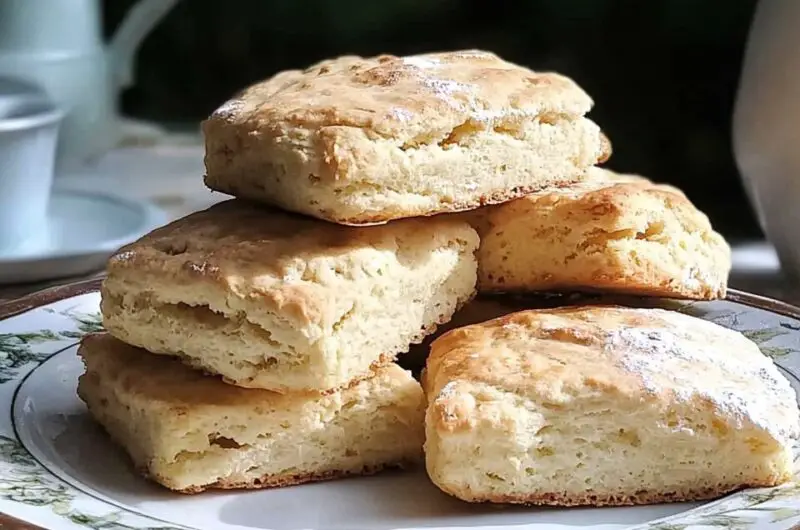
There’s nothing quite as comforting as a warm, freshly griddled Irish soda scone. These traditional white bannocks are a staple in Irish households, offering a simple yet delicious taste of home. Made with just four basic ingredients, they cook up quickly and deliver a soft, slightly tangy flavor thanks to the buttermilk. Whether served with a pat of butter, a dollop of jam, or a drizzle of honey, these scones are a delightful addition to any breakfast or tea-time spread. Their golden crust and fluffy interior make them an irresistible treat, and they pair perfectly with a hot cup of tea or coffee. If you’re looking for a quick and traditional Irish bread, this is the recipe for you!
Full recipe:
Ingredients:
-
2 cups all-purpose flour
-
1/2 teaspoon salt
-
1/2 teaspoon baking soda
-
1 cup buttermilk
Directions:
-
Preheat a griddle or heavy pan over medium heat.
-
In a large bowl, whisk together the flour, salt, and baking soda.
-
Gradually add the buttermilk, stirring with a spoon or your hands until a soft dough forms.
-
Turn the dough out onto a lightly floured surface and gently knead it a few times to bring it together.
-
Roll out the dough to about ½-inch thickness and cut into rounds or triangles.
-
Lightly dust the scones with flour and place them onto the hot griddle.
-
Cook for about 5 minutes on each side until golden brown and firm to the touch.
-
Remove from the heat and let cool slightly before serving warm with butter or jam.
Prep Time: 10 minutes | Cooking Time: 10 minutes | Total Time: 20 minutes
Kcal: 140 kcal | Servings: 8 scones
Irish Soda Scones: A Traditional Taste of Ireland
The History and Heritage of Irish Soda Scones
Irish soda scones, also known as white bannocks, have deep roots in Irish and Scottish baking traditions. These simple yet delicious scones are a variation of Irish soda bread, a staple in Ireland for generations. Unlike conventional scones that require butter, eggs, and sugar, soda scones rely on just four ingredients: flour, baking soda, salt, and buttermilk. This minimalistic approach stems from Ireland’s history, where access to yeast was limited, and baking had to be quick and efficient.
The introduction of baking soda (bicarbonate of soda) to Ireland in the 19th century revolutionized home baking. Traditional yeast breads required time to rise, but soda-based breads and scones could be made quickly without fermentation. This made them ideal for rural households where time and resources were scarce. Irish families cooked these scones on a griddle over an open fire, a method that continues to be popular today.
What Makes This Recipe Special?
These Irish soda scones stand out for their simplicity, authenticity, and versatility. Unlike many modern scone recipes loaded with butter and sugar, these are true to tradition—light, fluffy, and slightly tangy from the buttermilk. Here’s why this recipe is one of the best:
-
Quick & Easy – With only four ingredients, this recipe requires minimal preparation. You don’t need any fancy equipment, and there’s no need to wait for the dough to rise.
-
No Oven Required – These scones are griddle-cooked, making them ideal for times when you don’t want to turn on the oven.
-
Traditional & Authentic – Staying true to Irish heritage, this recipe preserves the classic taste of old-fashioned home baking.
-
Soft & Fluffy Texture – Thanks to buttermilk, the scones turn out tender and moist, with a delicate crumb.
-
Versatile & Customizable – While delicious on their own, these scones pair beautifully with butter, jam, honey, or even cheese for a savory twist.
Ingredients Breakdown & Their Role
Each ingredient in this recipe plays a crucial role in achieving the perfect soda scone.
-
Flour – Provides structure to the scones. All-purpose flour works well, but you can experiment with whole wheat for a nuttier flavor.
-
Baking Soda – The key leavening agent that reacts with buttermilk to create air pockets, making the scones rise.
-
Salt – Enhances the flavor and balances the tanginess of the buttermilk.
-
Buttermilk – The acidic component that activates baking soda, creating a light and fluffy texture while adding a subtle tang.
For those who don’t have buttermilk on hand, a simple substitute is 1 cup of milk mixed with 1 tablespoon of lemon juice or vinegar, left to sit for 5 minutes.
How to Serve Irish Soda Scones
One of the best things about these scones is their versatility. You can enjoy them warm straight off the griddle, or experiment with different toppings and pairings:
Sweet Toppings
-
Classic Butter & Jam – A dollop of butter with homemade strawberry or raspberry jam is a timeless favorite.
-
Honey & Clotted Cream – For a rich and indulgent treat, try spreading clotted cream with a drizzle of honey.
-
Cinnamon Sugar – Lightly sprinkle warm scones with cinnamon and sugar for a subtly sweet flavor.
Savory Pairings
-
Cheese & Herbs – Try adding sharp cheddar, chives, or garlic butter for a flavorful twist.
-
Smoked Salmon & Cream Cheese – A sophisticated way to enjoy these scones as a snack or light meal.
-
Eggs & Bacon – Perfect for breakfast, serve alongside scrambled eggs and crispy bacon.
Tips for Making the Best Soda Scones
Achieving the perfect Irish soda scone is easy, but a few tips can make a big difference:
1. Don’t Overwork the Dough
The dough should be mixed gently and handled as little as possible. Over-kneading can result in tough scones rather than soft, fluffy ones.
2. Use a Hot Griddle
Preheat your griddle or pan properly before cooking. This ensures the scones cook evenly, forming a golden-brown crust without burning.
3. Keep the Dough Moist
If the dough feels too dry, add a little more buttermilk, a teaspoon at a time. A slightly sticky dough will result in softer scones.
4. Flip Only Once
Cook for about 5 minutes on one side, then flip once and cook for another 5 minutes. Constant flipping can lead to uneven cooking.
5. Let Them Rest Before Serving
Although tempting to eat immediately, allowing the scones to rest for a few minutes lets the interior finish cooking while staying tender.
A Staple for Every Kitchen
This soda scone recipe is not just a treat—it’s a piece of culinary heritage. Whether you’re celebrating St. Patrick’s Day, exploring traditional Irish recipes, or simply looking for an easy and satisfying bread alternative, these scones will become a household favorite.
With their simple ingredients, fast preparation, and timeless flavor, they prove that some of the best recipes are the ones that have stood the test of time.
Frequently Asked Questions
Can I Make These Ahead of Time?
Yes! These scones can be stored in an airtight container at room temperature for up to 2 days. If you want them to last longer, refrigerate for up to a week or freeze for up to 3 months.
How Do I Reheat Soda Scones?
To revive them, warm in a toaster, oven (at 300°F for 5 minutes), or briefly on a griddle for a fresh-from-the-pan taste.
Can I Make Them Gluten-Free?
Yes! Substitute all-purpose flour with a gluten-free flour blend. Just ensure it contains a binding agent like xanthan gum for the best texture.
What’s the Difference Between Irish Soda Scones and Soda Bread?
Soda bread is typically baked in an oven as a large round loaf, while soda scones are griddle-cooked in smaller portions for a quicker and more individual-sized serving.
Can I Add Extras to the Dough?
Absolutely! Try mixing in:
-
Raisins or currants for a fruity touch
-
Cheese & herbs for a savory flavor
-
A sprinkle of sugar for a lightly sweetened scone
Conclusion
If you’ve never tried Irish soda scones before, this is your perfect introduction to traditional Irish baking. They are incredibly easy to make, require only a handful of pantry staples, and deliver a satisfying, rustic taste that transports you straight to the Irish countryside. Whether served for breakfast, a snack, or an afternoon tea, these golden-brown griddle scones will quickly become a favorite in your kitchen. Try them once, and you’ll find yourself making them again and again!


