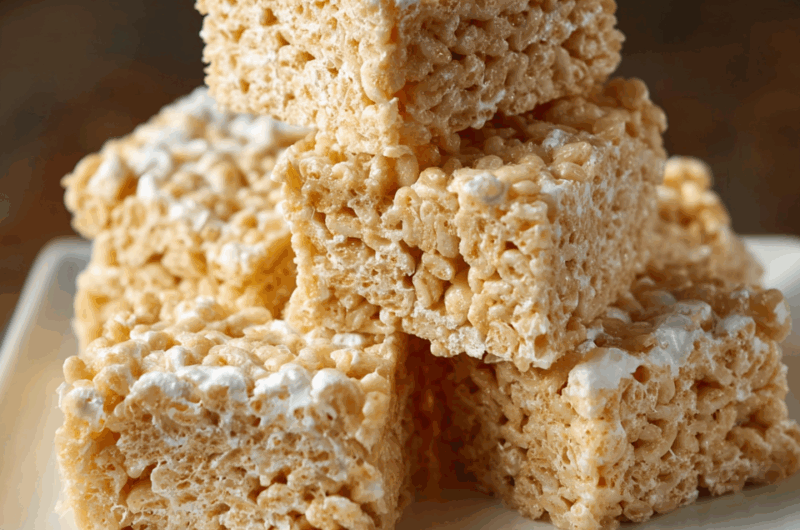
The secret to these irresistibly chewy Rice Krispies Treats lies in the browned butter and pure vanilla extract. Unlike the basic version you may remember from childhood, this upgraded recipe delivers layers of nutty, caramelized flavor that pair perfectly with the gooey marshmallows and crispy cereal. The result? A nostalgic treat with a gourmet twist. Perfect for bake sales, lunchbox surprises, or just a sweet snack with coffee, these treats come together in under 15 minutes with only a handful of ingredients. If you want to go the extra mile, a sprinkle of flaky sea salt on top makes the flavor pop even more. It’s the ultimate way to level up your no-bake dessert game.
Full recipe:
Ingredients:
-
6 tablespoons unsalted butter
-
1 (10-ounce) bag mini marshmallows (about 4 cups)
-
1/4 teaspoon salt
-
1-1/2 teaspoons pure vanilla extract
-
6 cups Rice Krispies cereal
-
Optional: flaky sea salt for topping
Directions:
-
Grease a 9×13-inch baking pan with nonstick cooking spray or butter.
-
In a large pot over medium-low heat, melt the butter. Continue cooking, stirring often, until the butter turns golden brown and smells nutty—about 3 to 4 minutes.
-
Reduce heat to low. Add the marshmallows and salt, stirring continuously until melted and smooth.
-
Remove from heat and stir in vanilla extract.
-
Add the Rice Krispies cereal and mix until evenly coated.
-
Quickly transfer the mixture to the prepared baking pan and gently press it in using a greased spatula or clean hands. Don’t pack it down too firmly.
-
Optional: sprinkle with flaky sea salt while still warm.
-
Let cool completely before cutting into squares.
Prep Time: 10 minutes | Cooking Time: 5 minutes | Total Time: 15 minutes
Kcal: 165 kcal | Servings: 12 servings
A Sweet Staple: The Irresistible Charm of Rice Krispies Treats
Few desserts stir childhood memories quite like Rice Krispies Treats. Whether you discovered them at a school bake sale, found them in your lunchbox as a surprise, or made them at home with a parent or grandparent, these sticky-sweet squares carry a strong sense of nostalgia. But when done right—with just a few gourmet upgrades—they’re no longer just a kid’s treat. They become a rich, chewy, satisfying dessert that both children and adults can’t resist.
The version we’re showcasing today is a step above your standard recipe. It takes the original three-ingredient formula and elevates it with browned butter, a pinch of salt, and a splash of pure vanilla extract. These simple enhancements transform a humble dessert into something complex, buttery, and full of flavor depth.
The Origins of Rice Krispies Treats
Rice Krispies Treats were first invented in 1939 by Malitta Jensen and Mildred Day, employees of Kellogg’s, as part of a promotional campaign for the cereal brand. The recipe was originally intended as a fundraiser snack for the Camp Fire Girls, a popular American youth organization. Simple, inexpensive, and endlessly adaptable, the treat quickly gained traction and became a beloved staple across households in the United States and beyond.
Over time, the recipe evolved into a blank canvas for bakers and home cooks who wanted to add their own twist—whether it’s chocolate chips, peanut butter swirls, or colorful sprinkles. But even in its purest form, it remains a classic.
Why Browned Butter Makes All the Difference
The hero of this recipe is browned butter. When you melt and cook butter just a bit longer, the milk solids begin to caramelize, releasing an incredible nutty aroma and toasty flavor. This golden elixir adds richness and complexity that plain melted butter simply can’t match.
Combined with marshmallows and vanilla, the browned butter infuses the entire batch of Rice Krispies Treats with a deep, almost caramel-like undertone. It’s an easy trick that makes your treats taste bakery-quality, with no extra time or fancy tools needed.
The Role of Salt and Vanilla
A touch of kosher or flaky sea salt might sound counterintuitive in a sweet recipe, but it’s essential. Salt enhances the overall flavor, providing contrast to the sweetness of the marshmallows and cereal. It also gives the treats a more balanced finish, which keeps you coming back for bite after bite.
Vanilla, especially when using high-quality extract or vanilla bean paste, brings warmth and aroma that elevate the treat beyond just “sweet.” It rounds out the flavors and gives the dessert a homemade, comforting essence that artificial or overly processed versions often lack.
Texture Is Everything
The perfect Rice Krispies Treat should be soft and chewy with just enough structure to hold its shape. This version achieves that by not over-packing the mixture into the pan. Pressing the mixture too firmly can lead to dense, hard squares. A gentle hand ensures the cereal maintains its airy crunch while the marshmallow mixture binds it all together with a gooey finish.
If you’ve ever had a store-bought Rice Krispies Treat and thought it tasted dry or tough, you’ll be amazed by the texture of these homemade ones. They’re soft, slightly stretchy, and melt-in-your-mouth delicious.
Kid-Friendly and Crowd-Pleasing
One of the biggest perks of this recipe is how family-friendly it is. Kids can help with most of the steps—like stirring the cereal into the melted marshmallows or pressing the mixture into the pan (with clean, greased hands, of course!). It’s also a great gateway recipe for young cooks who are just getting started in the kitchen.
Beyond that, these treats are a universal hit. Bring them to potlucks, bake sales, birthday parties, or holiday gatherings, and you’ll rarely have leftovers. Their familiar taste, portability, and allergen-friendly nature (no nuts or eggs unless added) make them a smart choice for large groups.
Versatility for All Occasions
This recipe is also endlessly versatile. You can use it as a base and build on it with mix-ins or toppings. Some popular variations include:
-
Drizzling with melted dark chocolate or white chocolate
-
Mixing in crushed Oreos, pretzels, or sprinkles
-
Swapping some of the marshmallows for peanut butter or Nutella
-
Adding food coloring to match holiday or party themes
-
Using cookie cutters for fun shapes
The base recipe holds up to all sorts of creative spins, making it a go-to for themed desserts or personalized treats.
Shelf Life and Storage Tips
One of the most convenient aspects of Rice Krispies Treats is how well they store. Kept in an airtight container at room temperature, they stay fresh for up to 5 days. If you want them softer, add a slice of bread into the container—it’ll keep the treats from drying out.
You can even freeze them! Wrap individual bars in plastic wrap and store in a freezer-safe bag. When you’re ready to eat, just let them thaw at room temperature for about 30 minutes.
Healthier Alternatives and Customizations
Although these treats are definitely indulgent, you can tweak them slightly for a healthier version without sacrificing flavor:
-
Use brown rice cereal for added fiber
-
Swap standard marshmallows for vegan versions
-
Add chia seeds, flax, or hemp hearts for a boost of nutrients
-
Use less butter or substitute with coconut oil
-
Incorporate dried fruit like cranberries or raisins
These adjustments can make the treat more appealing to health-conscious eaters or those with dietary restrictions.
Frequently Asked Questions (FAQs)
Can I make these treats gluten-free?
Yes! Rice Krispies cereal is not gluten-free by default (due to malt flavoring), but you can find certified gluten-free crispy rice cereals at most health food stores or online.
Can I double the recipe?
Absolutely. Just use a larger pan (like 11×17) and ensure you still stir quickly and thoroughly when mixing the marshmallows and cereal.
What if I don’t have mini marshmallows?
You can use regular marshmallows—just measure by weight (10 oz total) and cut them into smaller pieces to help them melt more evenly.
How do I prevent the treats from sticking?
Grease your tools and hands with nonstick spray or a bit of butter. You can also line the pan with parchment paper for easy removal and clean-up.
Conclusion
Rice Krispies Treats are a timeless favorite for good reason. With only a handful of ingredients, they’re quick, affordable, and deliver pure comfort in every bite. This elevated version—with browned butter, vanilla, and a touch of salt—proves that even the simplest recipes can be transformed into gourmet delights. Whether you’re making a batch for your kids, prepping snacks for a crowd, or just treating yourself to something sweet and nostalgic, this recipe will quickly become a go-to. And once you taste the difference that a few small tweaks can make, you’ll never go back to the boxed version again.

